How to edit interior photos: quick AI steps for results
How to edit interior photos: quick AI steps for results

Picture this: a potential buyer clicks on your listing, sees a dark, cluttered living room photo, and moves on within three seconds. That one bad image can cost you a showing, an offer, or a sale. Professional photography used to be the only fix, but AI-driven editing has changed the game entirely. Virtual staging costs now run as low as $25 per listing, and results arrive in minutes. This guide walks you through every step, from choosing the right tools to verifying your edits ethically, so your photos work as hard as you do.
Table of Contents
- What you need: Tools and requirements for editing interior photos
- Step-by-step guide: Editing interior photos with AI tools
- Avoid common mistakes: Ethical editing and best practices
- Confirm your edits: Verifying results and building trust
- Enhance your listings with AI-powered photo editing
- Frequently asked questions
Key Takeaways
| Point | Details |
|---|---|
| Use AI for quick edits | AI-powered editors let you enhance interior photos rapidly without costly outsourcing. |
| Follow ethical guidelines | Label virtual staging and avoid altering structural features to stay compliant and build trust. |
| Verify your results | Always review edits for accuracy, disclosure, and clarity before publishing your listing photos. |
| Save money and time | AI tools reduce editing costs and deliver professional-quality listing images in minutes. |
What you need: Tools and requirements for editing interior photos
Before you touch a single photo, you need the right setup. The good news is that the barrier to entry is low. A modern smartphone camera, a stable internet connection, and access to an AI editing platform are genuinely all you need to get started.
Here is a quick checklist to confirm you are ready:
- Device: Smartphone (iOS or Android) or desktop computer
- Camera resolution: At least 12 megapixels for sharp, print-ready results
- Internet speed: 10 Mbps or faster for smooth uploads and previews
- AI editing platform: Web-based or app-based tool with virtual staging features
- Photo format: JPEG or PNG, ideally shot in landscape orientation
- Ethical compliance: Commitment to labeling edited images and disclosing changes
Choosing the right platform matters. Here is a comparison of what to look for:
| Feature | Basic tools | Mid-tier AI editors | Advanced AI platforms |
|---|---|---|---|
| Editing speed | 5 to 15 minutes | Under 2 minutes | Under 30 seconds |
| Virtual staging | No | Limited | Yes, with labeling |
| Natural language input | No | No | Yes |
| Cost per edit | Free to $5 | $10 to $50 | $25 to $200/listing |
| Mobile app | Sometimes | Yes | Yes |
One thing that separates good editors from great ones is understanding the ethics upfront. Real estate photo editing ethics require you to label any virtually staged image clearly, disclose edits in your MLS listing, and never alter permanent features like walls, windows, or structural defects. Misleading edits can result in fines or lawsuits, so transparency is not optional.
If you are new to this process, the DIY photo editing guide covers foundational techniques, and the user-friendly editing for apartments resource walks through platform-specific workflows. Both are worth bookmarking before you start.
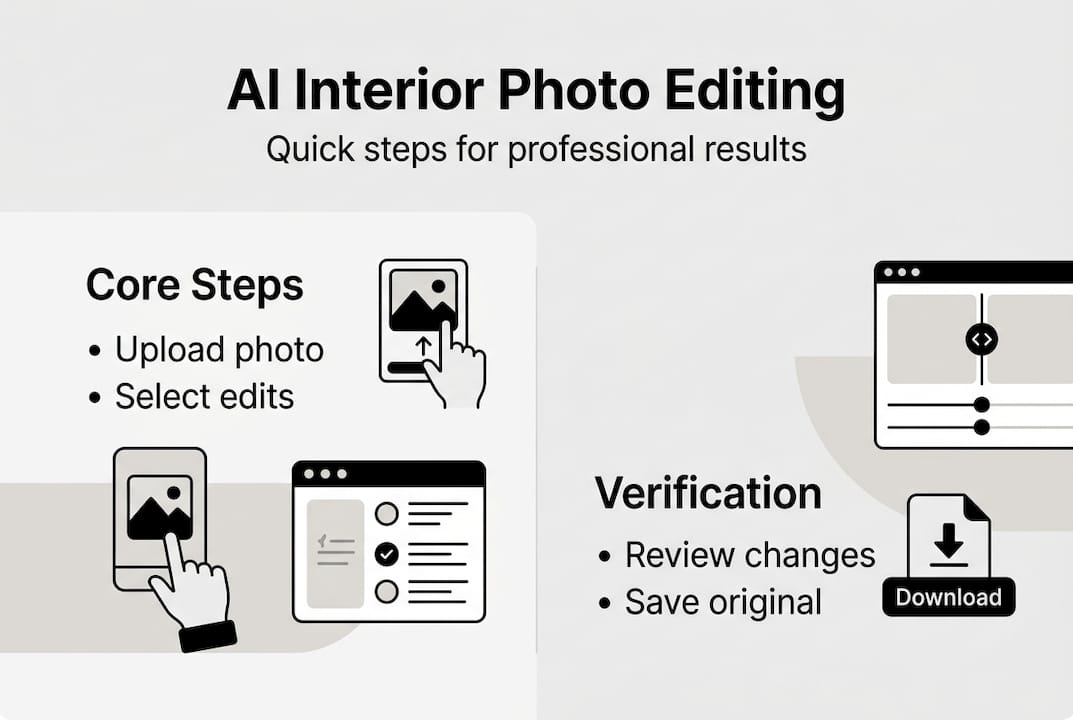
Step-by-step guide: Editing interior photos with AI tools
With your tools ready, follow this guided process to create standout photos for your listing. Each step builds on the last, so do not skip ahead.
- Declutter and prepare the room. Remove personal items, excess furniture, and anything that distracts the eye. Open blinds and turn on all lights. Natural light is your best friend, and a tidy room gives the AI editor a cleaner canvas to work with.
- Photograph from the right angle. Shoot from a corner or doorway at roughly chest height. This captures depth and makes rooms look larger. Avoid shooting directly at windows, which creates harsh backlighting.
- Upload your photo to the AI editor. Most platforms accept drag-and-drop uploads. Choose the image with the best natural lighting and composition.
- Select your enhancements. Common options include brightness and contrast adjustment, color correction, virtual decluttering, and virtual staging. Describe what you want in plain language if the platform supports it. For example, type “brighten the room and add a neutral sofa” and let the AI handle the rest.
- Preview and refine. Review the edited image carefully. Check that no permanent features have been altered and that the result looks realistic, not digitally manipulated.
- Download and label. Save the final image and add a clear label such as “virtually staged” before uploading to your listing.
Here is a quick reference for which edits are appropriate at each stage:
| Editing stage | Recommended action | Time estimate |
|---|---|---|
| Pre-shoot prep | Declutter, adjust lighting | 15 to 30 minutes |
| Upload and select | Choose enhancements, describe changes | 2 to 5 minutes |
| AI processing | Automatic | Under 30 seconds |
| Review and refine | Check accuracy and ethics | 5 to 10 minutes |
| Label and export | Add disclosure, download | 2 minutes |
AI tools cut editing costs dramatically compared to outsourcing to a professional photographer or staging company. The home photo editing tutorial shows real before-and-after examples, and the lighting adjustment tips resource explains how to fix common exposure problems before you even open an editor.
Pro Tip: Use virtual staging to show a room’s potential, not to hide its reality. Buyers who arrive expecting a staged look and find an empty room feel misled. Always pair your staged photo with an original shot in the listing.
For a deeper look at what counts as acceptable editing, review the editing ethics guidelines before publishing any enhanced images.
Avoid common mistakes: Ethical editing and best practices
Once you know the technical steps, it is crucial to avoid mistakes that can harm your reputation or lead to legal risks. The line between helpful enhancement and misleading manipulation is clearer than most people think.
Edits that are allowed:
- Adjusting brightness, contrast, and white balance
- Correcting lens distortion or perspective
- Removing temporary clutter (boxes, personal photos, trash)
- Adding virtual furniture with a clear “virtually staged” label
- Enhancing lawn color or sky in exterior shots, when disclosed
Edits that are not allowed:
- Removing or hiding structural defects (cracks, water stains, damaged floors)
- Altering the size or shape of rooms, windows, or doorways
- Adding features that do not exist (a fireplace, an extra window, a view)
- Digitally removing neighboring buildings or power lines to misrepresent location
“Misleading edits risk fines and lawsuits. Label virtually staged images, disclose changes in MLS, and always pair edited photos with originals.”
The real estate photo editing ethics framework is clear: any edit that could cause a buyer to form a false impression of the property crosses the line. Courts and real estate boards have ruled against agents who used deceptive images, and the financial and reputational damage is rarely worth it.
Transparency actually builds trust. Buyers who see both the original and the staged version feel more confident, not less. They understand what the space looks like now and what it could look like with the right furniture. That honesty converts browsers into serious inquiries.
Pro Tip: Always include the original, unedited photo alongside any virtually staged version in your listing. This single habit protects you legally and signals professionalism to buyers.
For a broader look at how ethical editing fits into a complete listing strategy, the seamless photo editing guide and interior redesign ideas resources offer practical frameworks. The virtual staging guidelines from industry sources also provide useful context on what platforms and MLS boards currently require.
Confirm your edits: Verifying results and building trust
To maximize impact, finish your editing process with thorough verification and transparent communication. Rushing this step is where most agents and homeowners lose the trust they worked hard to build.
Use this final review checklist before publishing any edited photo:
- Clarity: Is the image sharp, well-lit, and free of digital artifacts?
- Accuracy: Does the photo reflect the actual size, layout, and condition of the room?
- Labeling: Is every virtually staged image clearly marked as such?
- Disclosure: Have you noted all edits in your MLS listing description?
- Pairing: Is the original photo included alongside the edited version?
- Consistency: Do all photos in the listing use a consistent editing style?
Verification is not just about compliance. It is about making sure your photos actually do their job. A blurry or over-processed image can look worse than the original, and buyers notice. Take two minutes to zoom in on each photo at full resolution before uploading.
The real estate photo editing ethics standards also recommend keeping a record of your original files and the edits applied. If a buyer or board ever questions your images, having that documentation protects you immediately.
AI editing tools that use natural language editing make the verification step easier because the edit history is built into the platform. You can see exactly what instructions were given and what changes were made, which simplifies disclosure.
A quick stat worth knowing: Listings with professionally edited or AI-enhanced photos consistently attract more online views and generate inquiries faster than listings with unedited images. The investment in quality photos, even at $25 to $200 per listing, pays back in reduced time on market and stronger offers.
Enhance your listings with AI-powered photo editing
You now have a complete roadmap for editing interior photos quickly, ethically, and effectively. The next step is putting it into practice without spending hours learning complex software.

VibeMyFlat is built exactly for this workflow. You describe the changes you want in plain language, and the AI delivers professional results in under 30 seconds. No design background required, no expensive software subscriptions, and no guesswork about what looks good. Whether you are a real estate agent preparing a new listing or a homeowner visualizing a renovation, the AI photo editor for interiors gives you fast, high-quality edits that meet ethical standards. Try it on your next listing and see the difference a great photo makes.
Frequently asked questions
What AI tools are best for interior photo editing?
The best tools offer fast enhancements, virtual decluttering, and labeled virtual staging options. Compare features and pricing per listing to find the right fit for your volume and budget.
Is it ethical to remove defects or change room layouts in photos?
No. You must not alter permanent features or hide defects. All edits must be disclosed, and virtually staged images must be clearly labeled to avoid misleading buyers and risking legal consequences.
How much time and money does AI photo editing save?
AI tools reduce editing costs to $25 to $200 per listing and deliver results in minutes rather than the hours required by traditional outsourcing.
Do I need to disclose edited or staged photos on MLS?
Yes. All virtually staged or significantly edited photos must be disclosed in your MLS listing and labeled clearly to comply with industry guidelines and maintain buyer trust.