Practical interior design guide for inspired home spaces
Practical interior design guide for inspired home spaces
TL;DR:
- Proper planning involving measurements, style ideas, and budget details prevents costly mistakes during interior design. Layered lighting, digital visualization tools, and flexible furniture choices help create functional and adaptable living spaces. Final walkthroughs ensure everything looks and functions well, with adjustments made for comfort and long-term satisfaction.
You have a clear picture in your head of what your home could look like, but every time you try to make it happen, you hit a wall. Where do you even start? Which furniture goes where? Will that paint color actually work once it’s on the wall? Most homeowners feel stuck between inspiration and execution, and that gap costs real money when mistakes happen. This guide walks you through a proven, step-by-step process for planning, executing, and verifying an interior design project from start to finish, using practical tools and straightforward strategies to help you avoid the most common and expensive pitfalls.
Table of Contents
- What you need to get started: Homeowner interior planning essentials
- Laying the groundwork: Step-by-step interior planning
- Lighting: Transform your space with layers and placement
- Using digital tools: Visualize before you renovate
- Troubleshooting common room layout challenges
- Verifying and finalizing your design: Walkthrough and punch list
- The overlooked secret: Flexibility beats perfection in interiors
- Ready to transform your space? Start with smart design tools
- Frequently asked questions
Key Takeaways
| Point | Details |
|---|---|
| Plan before you shop | Start your interior design project with careful measurements and style direction for the best results. |
| Use layered lighting | Mix overhead, task, and accent fixtures to create flexible and inviting rooms. |
| Visualize your ideas | Leverage 2D/3D apps to see layouts and color schemes before committing money or time. |
| Solve layout problems smartly | Tailor fixes to each space’s challenge rather than following generic decor rules. |
| Flexibility is key | Allow your design to evolve with your lifestyle for enduring, comfortable spaces. |
What you need to get started: Homeowner interior planning essentials
To make any design happen, you need a few basics in place before diving into colors or shopping lists. Here’s how to set yourself up for success.
A successful project begins long before you pick a paint swatch. Following an interior planning workflow means starting with basic room layout, then aligning furnishings, defining your style, setting a budget, and checking practical details like electrical and lighting points. Skipping any of these steps usually means backtracking later, which costs time and money.
Here’s your starter checklist before anything else:
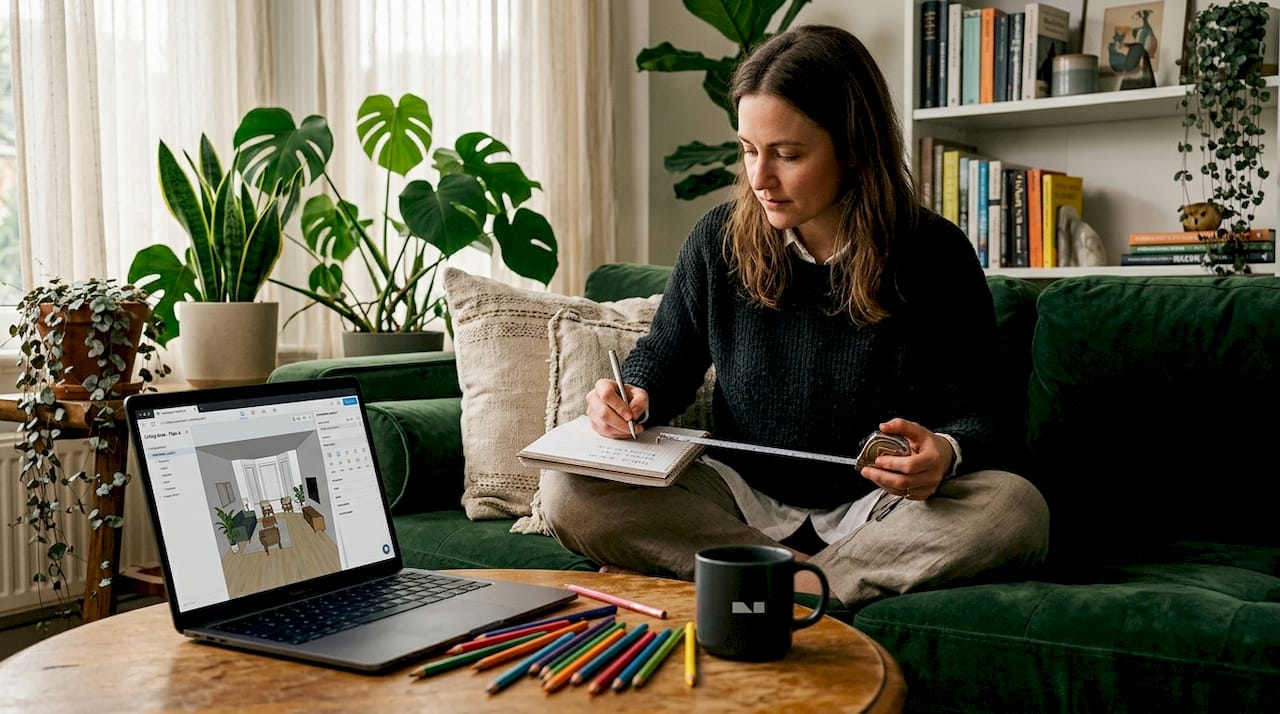
- Measuring tape and notepad to record exact room dimensions, including ceiling height
- House plans or hand-drawn sketches with door and window placements marked
- Photos of your current space taken from multiple angles in natural light
- Inspiration images collected from magazines, social media, or design blogs
- A rough budget worksheet broken into categories: furniture, fixtures, labor, and contingency
- Electrical outlet and lighting point locations noted during your initial walkthrough
This checklist might seem basic, but most homeowners skip at least two items and pay for it later. Knowing where your outlets are, for example, determines where you can realistically place a reading lamp or a home office setup.
Pro Tip: During your first walkthrough of the space, photograph every outlet, light switch, and window from a step back. You’ll reference these images constantly and save yourself multiple return trips to measure things you forgot.
| Essential item | Why it matters | How to gather it |
|---|---|---|
| Room dimensions | Prevents furniture that doesn’t fit | Measure twice, note in a dedicated notebook |
| Style direction | Keeps purchases cohesive | Save 10 to 20 inspiration images |
| Budget worksheet | Avoids overspending | Divide total budget into categories |
| Electrical layout | Informs furniture placement | Walk room with phone camera |
| Photos of space | Reference during planning | Shoot in daylight from each corner |
Once you have this information gathered, you’re ready for the real planning. Our DIY photo editing guide shows how digital tools can help you build on this foundation, and you’ll find more practical tools and tips in our resource library.
Laying the groundwork: Step-by-step interior planning
With your essentials in hand, you’re ready to break the process into manageable steps, making interior design less overwhelming and more systematic.
Interior design is not just about picking pretty things. True design guidance includes systems-level planning like traffic flow, proportions and scale, and aligning fixed elements like cabinetry, flooring, and built-ins with your chosen style. Getting these systems right first means every decorating decision you make afterward will look intentional rather than accidental.
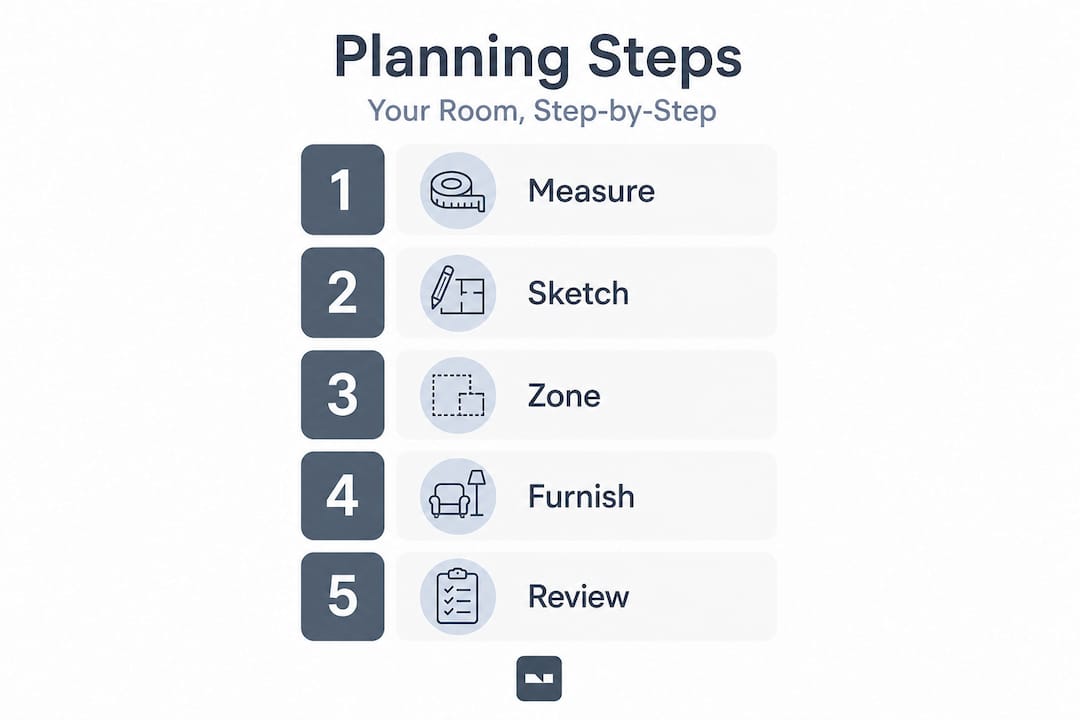
Follow these numbered steps to move from blank space to actionable plan:
- Map the traffic flow. Identify how people move through the space. Leave at least 36 inches of clear walkway between furniture pieces and walls.
- Place anchor pieces first. Sofas, beds, and dining tables dictate the room’s organization. Position them before anything else.
- Choose a style direction. Narrow down to one or two complementary design styles rather than mixing five. Consistency creates calm.
- Add secondary furniture. Once anchors are set, layer in side tables, accent chairs, and storage pieces.
- Plan your lighting zones. Assign task, ambient, and accent lighting locations before buying fixtures.
- Set a firm budget per category. Furniture, lighting, textiles, and accessories each get their own allocation.
- Double-check practical details. Confirm clearances around doors, heating vents, and windows.
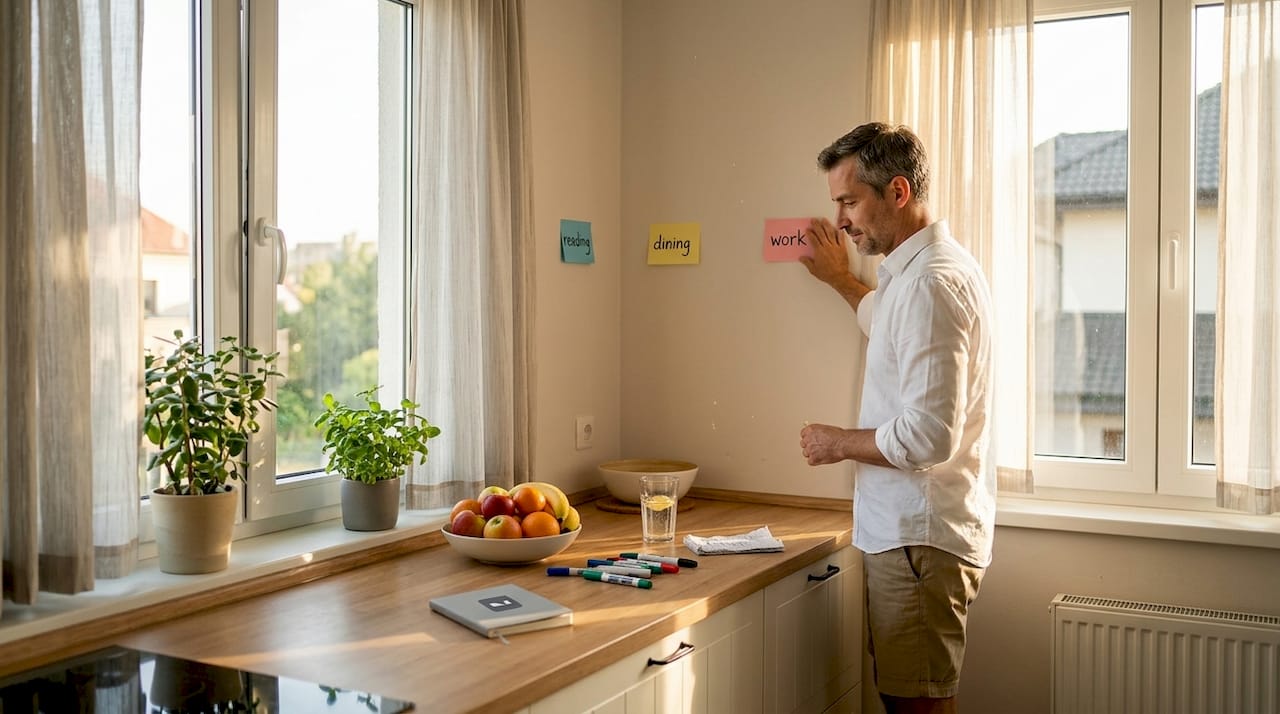
For smarter interior planning, think of your room as a series of zones rather than one big space. Each zone serves a purpose: conversation, work, display, or passage.
| Planning tool | Best for | Cost | Ease of use |
|---|---|---|---|
| Hand sketches | Quick concept layouts | Free | Very easy |
| Digital floor plan apps | Precise measurements | Free to $15/month | Moderate |
| 3D design software | Full visual preview | $10 to $50/month | Learning curve |
| AI photo editing tools | Photo-based changes | Free to $20/month | Very easy |
Our renovation planning tips can help you refine this process once you’ve got your basic workflow down.
Pro Tip: If you’re torn between two layout options, sketch both and live with each sketch pinned to the wall for 48 hours. Your gut reaction after sleeping on it is usually the right one.
Lighting: Transform your space with layers and placement
Lighting is often overlooked in early planning, but it’s one of the fastest ways to change how a space looks and feels.
“Layered lighting, not just overhead, is a core practical principle for making rooms feel finished and comfortable.” — The Spruce
This quote captures something designers know that most homeowners don’t: a single overhead fixture is almost never enough. Layered lighting uses a mix of ceiling, table, floor, and wall fixtures working together to create depth, warmth, and flexibility. A well-lit room feels larger, more welcoming, and more functional.
Here are the four fixture types you need in any well-designed room:
- Overhead or ambient lighting provides general illumination (recessed lights, flush mounts, chandeliers)
- Task lighting targets specific activities like reading or cooking (desk lamps, under-cabinet strips, pendants)
- Accent lighting highlights art, architectural features, or shelving (wall sconces, picture lights, track lighting)
- Decorative lighting functions as a visual focal point, not just a light source (statement pendants, sculptural floor lamps)
For apartment lighting tips that balance all four layers, start with your overhead fixture and work downward. Layering from ceiling to floor ensures nothing gets lost in shadow.
Check out these lighting design tips for luxury-level results in everyday spaces, or browse living room fixture ideas to spark your fixture selection process.
Pro Tip: Install dimmers on every circuit you can. The ability to shift from bright task lighting to warm ambient glow costs very little at installation but dramatically expands how your room functions throughout the day and into the evening.
Using digital tools: Visualize before you renovate
With the right software and apps, you can see your ideas before making permanent changes, saving money and reducing stress.
One of the biggest shifts in homeowner design over the past five years is the rise of visualization tools. 3D room visualization apps let you preview layouts, furniture placement, and style choices before making any real-world changes. This means fewer expensive returns and far less second-guessing.
Here’s how to get started with any visualization tool:
- Import your floor plan using room dimensions or a built-in scanner if the app supports it
- Add walls, doors, and windows to match your actual space
- Drop in furniture from the app’s catalog, adjusting size and placement until the layout feels right
- Adjust colors on walls, floors, and furnishings to test combinations virtually
- Experiment with lighting by toggling fixture positions and intensities within the 3D view
Our guide on digital visualization tips explains why this step alone saves homeowners hundreds of dollars in return shipping costs and wrong-size furniture mistakes. You should also check out our mobile editing tips if you prefer working from your phone.
| Tool | Features | Cost | Best for |
|---|---|---|---|
| Homestyler | 3D layout, furniture catalog | Free | Room planning beginners |
| SketchUp Free | Detailed 3D modeling | Free | More technical users |
| VibeMyFlat | AI photo editing with natural language | Free tier available | Instant visual changes |
| Planner 5D | Floor plans + 3D view | Free to $9.99/month | Full room design |
Pro Tip: Before spending money on a premium app, use the free trial to test just one room. If the tool helps you make one confident decision, it’s already paid for itself.
Troubleshooting common room layout challenges
Even with a solid plan, many homes have tricky spots. Let’s address some of the most common and how to fix them.
Targeted fixes beat generic decor rules when you’re dealing with awkward corners, cramped seating arrangements, or dead-end walls. Most layout problems have practical, affordable solutions once you name them clearly.
Follow these steps for the most common layout headaches:
- Dead corner: Place a floor lamp plus a small side table and a single accent chair. This turns wasted space into a functional reading spot.
- Cramped seating area: Swap a large sectional for a sofa and two accent chairs arranged at angles. Less bulk, same seating capacity, better flow.
- Blocked walkway: Pull furniture at least 18 to 24 inches away from doorways to create clear entry and exit paths.
- Low ceiling feeling: Use tall, narrow vertical elements like floor-to-ceiling curtains or tall bookshelves to draw the eye upward.
- Awkward alcove: Add custom shelving or a built-in bench to make the space look intentional rather than leftover.
Quick room-by-room fixes worth knowing:
- Living room: Float furniture away from walls instead of pushing everything to the perimeter
- Bedroom: Use matching nightstands and lamps to create visual balance even in asymmetric rooms
- Kitchen: Add a rolling cart for extra prep space and storage without permanent installation
- Bathroom: Replace a hinged door with a pocket or barn-style door to reclaim tight square footage
For more room redesign solutions, our idea library covers dozens of specific scenarios. For additional storage solutions for homeowners, especially in smaller spaces, this resource covers practical, no-fuss approaches.
Pro Tip: Custom shelving built to your exact wall dimensions almost always looks better and costs less long-term than trying to make off-the-shelf units fit imperfectly. A local carpenter can often quote surprisingly affordable prices for simple built-ins.
Verifying and finalizing your design: Walkthrough and punch list
After design and installation, one last round of checks ensures your space works as well in daily life as on paper.
A homeowner checklist approach separates the planning and design phase from the construction or installation phase and then adds a final punch list walkthrough. This final review catches the details that got lost in the excitement of the project, things like uneven paint edges, a drawer that scrapes a baseboard, or a sconce that sits slightly crooked.
Walk through your finished space with these steps:
- Check every light fixture by turning it on and off. Confirm bulbs match in color temperature throughout the room.
- Test all drawers, cabinet doors, and hardware. Anything stiff or misaligned should be adjusted now, not six months later.
- Look at paint edges and corners in both natural and artificial light. Touch up any bleed or thin spots.
- Sit in every seat. Feel whether traffic flow works around each piece of furniture in actual use.
- Review storage. Can you access what you need without moving three things first? If not, reorganize now.
| Punch list item | What to check | Quick fix |
|---|---|---|
| Paint touch-ups | Edges, corners, nail holes | Small brush and leftover paint |
| Hardware alignment | Cabinet pulls, drawer handles | Screwdriver adjustment |
| Light bulb consistency | Color temperature across fixtures | Replace mismatched bulbs |
| Furniture placement | Traffic flow, clearances | Shift pieces 2 to 4 inches |
| Cleaning | Dust from installation, smudges | Final wipe-down session |
Check your home renovation checklist against this table to make sure nothing slips through.
Pro Tip: Revisit your room layout after 30 days of real living. You’ll notice quickly which things aren’t working in practice, and small adjustments at this stage are always easier than waiting until you’ve mentally accepted a design flaw as permanent.
The overlooked secret: Flexibility beats perfection in interiors
Here’s something most design guides won’t tell you: the homes that look the best and feel the most comfortable are rarely the ones that followed every rule exactly. They’re the ones whose owners gave themselves permission to keep adjusting.
Interior design has a way of making homeowners feel like they need to get everything exactly right on the first attempt, as if being “done” means the space is locked in forever. But treating rules as tools and adjusting when they conflict with comfort and everyday use is what actually produces a home that feels lived-in and genuine rather than staged.
Think about it this way: that perfect gallery wall you planned may look slightly off once the furniture is moved in. The rug you loved in the showroom might feel too formal once you’ve had a year of family dinners on it. These aren’t failures. They’re the natural result of a living, changing household encountering a static design.
The best approach is to build flexibility into every design decision from the start. Buy furniture on legs rather than pieces that sit flush to the floor, because you can move things on legs. Choose paint colors that work in multiple lighting conditions. Invest in quality for permanent elements like flooring and cabinetry, but keep flexible pieces like throw pillows, rugs, and art relatively affordable so you can switch them out as your taste evolves.
Our library of adaptable design ideas covers this mindset in much more detail for every room type.
Pro Tip: When planning, always ask yourself, “What would I change about this in two years?” If you can’t answer that question, you probably haven’t stress-tested the design enough for real life. Leave one wall bare, one corner uncommitted, or one budget category with 10% held back for the adjustments that are definitely coming.
Ready to transform your space? Start with smart design tools
With your personalized plan in hand, it’s easier than ever to bring your ideas to life using supportive tools and expert advice.
Putting all of this planning into motion is exciting, but it’s also where many homeowners stall out, wishing they could just see what the finished result would look like before committing. That’s exactly what VibeMyFlat was built for.

VibeMyFlat lets you upload a photo of any room and describe the changes you want in plain language. Want to see that wall in a warm sage green? Curious how a pendant light would look above your dining table? The AI processes your request in under 30 seconds and delivers a professional-quality preview. No complex software, no design degree required. Explore design tools and start turning your planning into visible, shareable design previews today.
Frequently asked questions
What is the first step in planning interior design for my home?
Begin with a basic layout and overall style direction, using your house plan and measurements to guide your decisions. Following a structured interior planning workflow means getting room dimensions and style sorted before you touch anything else.
Why is layered lighting recommended in every room?
Using multiple light types at different heights finishes a space and adds comfort far beyond what a single ceiling fixture can achieve. Layered lighting creates depth, warmth, and flexibility across different times of day and activities.
Can I preview different layouts or color schemes before buying anything?
Yes, 3D visualization apps let you test layouts, furnishings, and color schemes virtually so you make confident choices before spending a dollar.
What is the best way to deal with small or awkward rooms?
Focus on targeted solutions like custom fixtures, strategic lighting, and purpose-built storage to fix difficult corners or cramped areas rather than applying generic decor rules.
How do I make sure my design works once it’s installed?
Walk through the finished space using a punch list walkthrough to check function, comfort, and any adjustments needed, then revisit after 30 days of real use.