Property Listing Photo Improvement: Your 2026 Guide
Property Listing Photo Improvement: Your 2026 Guide

TL;DR:
- Proper property photo improvement involves targeted editing and strategic sequencing to boost buyer interest and comply with legal disclosures. Leading with kitchens and living rooms in the gallery enhances click-through rates, while transparent disclosure of AI edits ensures legal compliance under AB 723. Using tools like Lightroom, Photoshop, and Vibemyflat optimizes workflow efficiency, maintaining image authenticity and market appeal.
Property listing photo improvement is the process of enhancing listing images through targeted correction, editing, and optimization techniques to increase buyer engagement and market visibility. Done right, it transforms an average photo set into a gallery that stops scrollers and drives inquiries. The stakes are real: photo quality directly affects click-through rates, time on market, and perceived property value. This guide covers the tools, step-by-step workflow, strategic photo sequencing, and 2026 legal requirements every real estate professional and homeowner needs to know before publishing a single image.
What are the best tools for property listing photo improvement?
Property listing photo improvement starts with the right equipment and software. On the hardware side, a full-frame DSLR or mirrorless camera paired with a wide-angle lens (16mm to 24mm range) captures rooms accurately without excessive distortion. A sturdy tripod is non-negotiable for interior shots where slow shutter speeds are required to balance ambient and artificial light. Portable LED panels or speedlights fill shadows that natural light cannot reach.
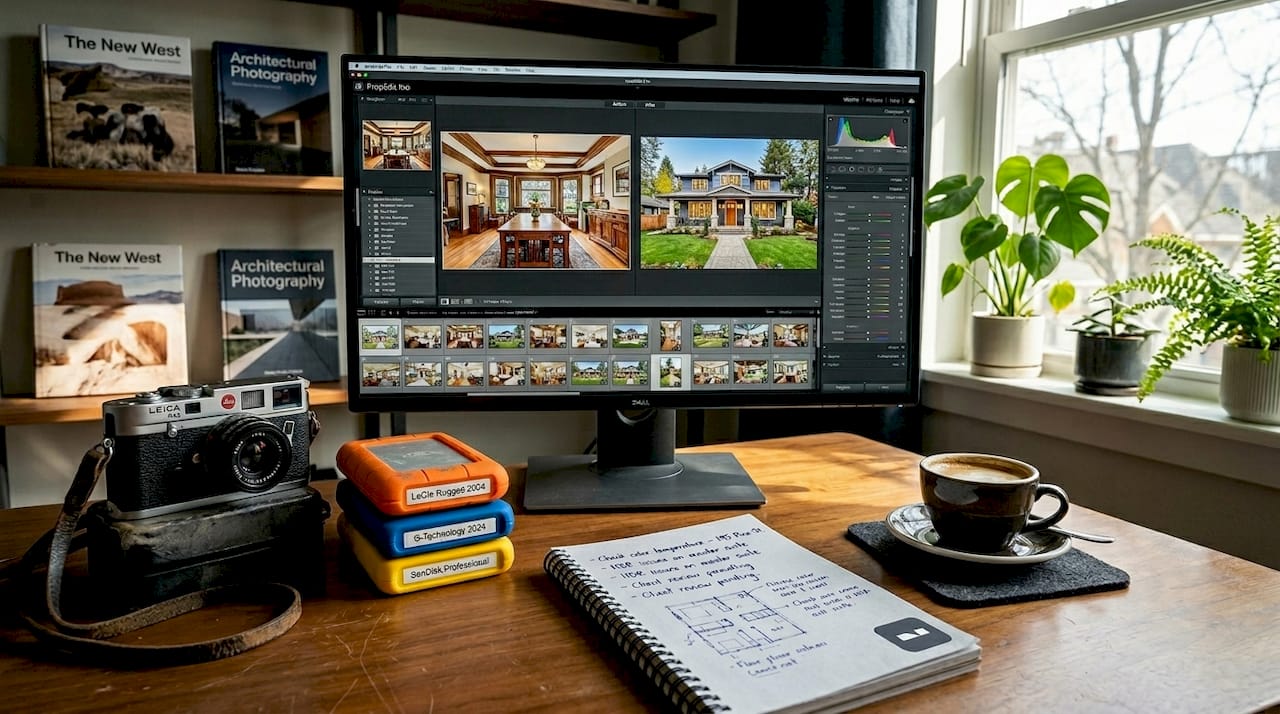
Software is where most of the transformation happens. Adobe Lightroom handles batch color correction and exposure adjustments across entire photo sets. Adobe Photoshop covers detailed retouching, object removal, and sky replacement. AI-powered tools like Vibemyflat allow users to describe edits in plain language and receive processed results in under 30 seconds, making them practical for agents who handle high listing volumes without a dedicated editing team.
Before you open any editor, confirm your technical baseline. Listing platforms typically require JPEG files at 72 to 96 DPI for web display, with minimum dimensions around 1024 by 768 pixels. Shooting in RAW format gives you maximum latitude for exposure and color correction during post-processing. Delivering files in the wrong format or resolution wastes editing time and degrades image quality on the platform side.
| Tool | Primary function | Approximate cost |
|---|---|---|
| Adobe Lightroom | Batch color and exposure correction | $9.99/month |
| Adobe Photoshop | Detailed retouching and compositing | $20.99/month |
| Vibemyflat | AI-driven natural language photo editing | Subscription-based |
| Tripod + LED panel | Stable capture and fill lighting | $50 to $300 one-time |
Pro Tip: If you are new to editing, start with Lightroom presets calibrated for real estate interiors. They apply consistent color temperature and exposure adjustments across your entire shoot in one click, cutting editing time by more than half.
How to perform step-by-step photo enhancements for real estate listings
A structured editing workflow produces consistent results and prevents the common mistake of fixing one problem while creating another. The standard photo editing workflow for real estate includes exposure correction, color correction, perspective alignment, HDR blending, and image cleanup. Follow these six steps in order.
-
Exposure correction. Adjust highlights, shadows, whites, and blacks to balance uneven lighting across the frame. Interior shots almost always require pulling down bright windows while lifting dark corners. This step sets the foundation for every adjustment that follows.
-
Color correction. Set white balance to match the dominant light source in the room, whether that is daylight, tungsten, or mixed. Tonal adjustments to saturation and vibrance bring colors to life without making them look artificial. Skin tones in staging photos and wood grain in flooring are reliable reference points for accuracy.
-
Perspective alignment. Wide-angle lenses introduce barrel distortion and converging vertical lines that make walls appear to lean inward. Use Lightroom’s Lens Corrections panel or Photoshop’s Perspective Warp to straighten verticals and correct keystoning. Buyers notice crooked walls even when they cannot name the problem.
-
HDR blending. High dynamic range photography merges multiple exposures (typically three to five brackets) to capture detail in both bright windows and shadowed interiors simultaneously. This technique is standard for living rooms and kitchens where window views are a selling point.
-
Image cleanup. Removing temporary distractions such as power cords, debris, and reflections improves presentation without falsifying property features. Use Photoshop’s Content-Aware Fill or Healing Brush for this step. Removing a visible electrical cord is honest marketing. Removing a structural crack is not.
-
Platform optimization. Resize and export files to meet the specific requirements of Zillow, Realtor.com, Apartments.com, or your MLS. Compress files to reduce load time without visible quality loss. Consistent file naming and folder organization at this stage saves significant time when uploading multiple listings.
Pro Tip: Use Lightroom’s batch processing to apply your base exposure and color settings to every photo in a shoot before doing any individual adjustments. This creates a consistent baseline across the set and cuts total editing time by 40 to 60 percent.
Which types of property photos perform best in listings?

Photo selection and sequencing are as important as image quality itself. Kitchens, living rooms, and bedrooms perform best as primary photos in rental and for-sale listings, while bathrooms and fitness centers perform poorly as lead images. This finding from Apartments.com analysis means that the first photo a buyer sees should almost never be a bathroom, regardless of how well it was renovated.
The logic behind this pattern is straightforward. Buyers and renters make split-second decisions about whether to click through a listing. Kitchens and living rooms communicate lifestyle and scale. They answer the question “Can I see myself living here?” faster than any other room. Bedrooms signal the number of private spaces available. Bathrooms and utility areas answer secondary questions that buyers only ask after they are already interested.
For high-end single-family homes, a strong exterior shot can work as the primary image, particularly when curb appeal is a genuine differentiator. For condos and apartments, interior shots almost always outperform exteriors as the lead photo. Floor plans and 3D tours generate significantly more leads when added alongside photos, providing spatial context that static images cannot deliver alone.
Best practices for photo ordering in your listing gallery:
- Lead with the kitchen or main living area as photo one
- Follow with additional living spaces and the primary bedroom
- Place secondary bedrooms and bathrooms in the middle of the carousel
- Move fitness centers, storage rooms, and utility spaces to the end
- Add floor plans and exterior shots after the interior sequence for apartments
- Reserve the final slots for neighborhood amenity photos
Pro Tip: Treat your cover photo as a separate decision from the rest of the gallery. Test two or three different lead images on the same listing during the first week and track click-through rates. The data will tell you which room sells your specific property fastest.
What legal and ethical rules apply to listing photo editing in 2026?
California’s Assembly Bill 723, effective January 1, 2026, requires disclosure when listing photos have been digitally altered, with access to the original unedited images on all platforms. The disclosure must be reasonably conspicuous and placed adjacent to the altered image. This law covers common edits including lighting changes, lawn greening, and digital decluttering.
AB 723 compliance rule: Disclosure is required when edits make the property appear different from its true state. Routine adjustments like sharpening, white balance correction, and cropping do not require disclosure if they do not change the property’s actual depiction.
The practical boundary is this: correcting how a camera captured reality is acceptable. Changing what reality looks like is not. Fixing a blown-out window exposure so buyers can see the actual view outside is a correction. Replacing a gray overcast sky with a sunny blue one is an alteration that requires disclosure under AB 723.
AI-altered listing photos face increasing regulatory scrutiny because they can change property conditions in ways that are difficult for buyers to detect. Virtual staging, sky replacement, and AI-generated lawn improvements all fall into the disclosure category. Non-compliance exposes agents and brokers to buyer claims of misrepresentation and potential license consequences.
Pro Tip: Deliver edited and original images together, either in the same photo sequence or via an accessible link in the listing, to comply fully with AB 723 and maintain buyer transparency. Keeping both versions organized by property address makes compliance straightforward and protects you if questions arise after closing.
How to troubleshoot common mistakes in your photo improvement process
The most frequent errors in real estate photo editing fall into four categories: over-editing, poor lighting at capture, ignoring perspective distortion, and weak photo sequencing. Each one is fixable once you know what to look for.
- Over-editing: Saturation pushed too high makes rooms look artificial. If the grass outside looks neon green or the white walls look blue, pull back the vibrance and check your white balance setting.
- Poor capture lighting: No amount of editing fixes a photo taken in harsh midday sun streaming through uncovered windows. Shoot interiors during overcast conditions or use window coverings to control light at the source.
- Uncorrected perspective: Walls that lean or converge toward the top of the frame signal amateur photography to buyers. Always apply lens correction and manual perspective adjustments before exporting.
- Weak photo order: Listing galleries that open with a bathroom or a utility room lose potential buyers in the first three seconds. Reorder your gallery using the kitchen-first rule before publishing.
Consistency in exposure, color tone, and style across an entire image set improves buyer interpretation of property layout and signals professionalism. A gallery where every photo has a different color temperature or brightness level looks disorganized, even if each individual image is technically correct.
| Common mistake | Quick fix | Tool to use |
|---|---|---|
| Over-saturated colors | Reduce vibrance and saturation by 15 to 20 points | Lightroom |
| Converging verticals | Apply Upright correction and manual keystone adjustment | Lightroom or Photoshop |
| Inconsistent color tone | Apply a single preset to all images, then fine-tune individually | Lightroom batch sync |
| Distracting objects | Use Content-Aware Fill to remove cords and debris | Photoshop |
Pro Tip: Build a pre-publish checklist that covers exposure consistency, perspective correction, object removal, and photo order. Running through it before every listing upload takes five minutes and catches 90 percent of errors before buyers see them.
Key takeaways
Strong property listing photo improvement requires a disciplined workflow, strategic photo sequencing, and full compliance with 2026 disclosure laws to convert browsers into buyers.
| Point | Details |
|---|---|
| Follow a six-step editing workflow | Correct exposure, color, perspective, HDR, cleanup, and platform formatting in that order. |
| Lead with kitchens and living rooms | Primary photos from these rooms drive higher click-through rates than bathrooms or utility spaces. |
| Know your AB 723 obligations | Disclose all edits that change how the property actually looks, and provide access to originals. |
| Use batch processing for consistency | Applying base settings across a full shoot saves time and creates a cohesive visual presentation. |
| Treat photo order as a conversion tool | Sequencing your gallery strategically is as impactful as image quality itself. |
What I’ve learned from watching listings win and lose on photos alone
After spending years analyzing what separates listings that generate immediate inquiries from those that sit, the answer is almost never the property itself. It is the photos. Specifically, it is whether the photos were edited with a clear strategy or just “touched up” and uploaded.
The single biggest mistake I see is agents treating photo editing as a quality check rather than a marketing decision. Fixing a dark photo is quality control. Choosing which corrected photo leads your gallery is marketing. Most professionals do the first part and skip the second entirely.
On the legal side, California’s AB 723 is not a burden. It is a framework that forces better habits. Keeping original files organized and disclosures in place protects agents as much as it protects buyers. The agents who resist this are usually the ones who have been over-editing without thinking about it.
AI tools like Vibemyflat are genuinely useful for speed and accessibility, particularly for homeowners and smaller agencies without dedicated photographers. The key is human oversight ensuring authenticity at every step. AI handles the repetitive work. You make the judgment calls about what is honest and what crosses a line.
My honest recommendation: invest 20 minutes in your photo order before you invest hours in editing. A perfectly edited bathroom photo in slot one still loses to a decent kitchen photo. Get the sequence right first, then refine the images.
— Hello
How Vibemyflat makes property photo enhancement fast and compliant
Vibemyflat is built for exactly the workflow this guide describes. The platform’s AI processes exposure correction, color adjustments, and interior enhancements in under 30 seconds using plain-language instructions. You describe what you want changed, and the result is professional-quality output without requiring Photoshop expertise.

For real estate agents managing multiple listings and homeowners preparing a property for sale, Vibemyflat reduces editing time while maintaining the accuracy that AB 723 compliance demands. The platform supports the full property listing improvement process from initial enhancement through final export, keeping original and edited versions accessible for disclosure requirements. If you want faster turnaround without sacrificing quality, Vibemyflat is where to start.
FAQ
What is property listing photo improvement?
Property listing photo improvement is the process of correcting and enhancing listing images through exposure adjustment, color correction, perspective alignment, and strategic sequencing to increase buyer engagement and click-through rates.
Which rooms should lead a property listing photo gallery?
Kitchens, living rooms, and bedrooms perform best as primary listing photos. Bathrooms and fitness centers consistently underperform as lead images and should be placed later in the gallery carousel.
Do I need to disclose AI edits in my listing photos?
Under California’s AB 723, effective January 1, 2026, you must disclose any edits that make the property appear different from its actual condition, including AI-generated changes like sky replacement or lawn greening. Routine corrections like white balance and sharpening do not require disclosure.
What software do real estate agents use to edit listing photos?
Adobe Lightroom is the standard tool for batch color and exposure correction across full property shoots. Adobe Photoshop handles detailed retouching and object removal. AI platforms like Vibemyflat offer fast, natural language-driven editing for agents without advanced technical skills.
How does photo order affect listing performance?
Photo choice and order materially affect click-through rates on listing platforms. Leading with high-performing rooms like kitchens and living rooms and moving lower-performing spaces toward the end of the carousel directly improves the number of buyers who engage with a listing.